
The Auto Sequence feature helps your FarmDroid robot continue working smoothly when field conditions become challenging. By automatically responding to certain issues, it can reduce downtime, limit manual intervention, and keep your seeding and weeding operations running efficiently.
What is Auto Sequence?
When Auto Sequence is activated, the robot will:
- Pause briefly
- Lift the hitch
- Move the weeding arm against the seeding unit
- Continue this action for 4 to 10 seconds
This simple sequence can help clear debris, loosen stuck seeds, and reduce recurring errors during operation.
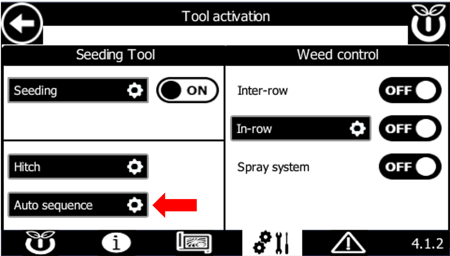
You can turn Auto Sequence ON or OFF using the switch located at the bottom left of Page 4.1.2.
HOW DOES IT WORK?
When Auto Sequence is OFF
If an alarm occurs, the robot will:
- Stop immediately
- Send a notification
- Wait for your intervention
When Auto Sequence is ON
If an alarm occurs, the robot will:
- Automatically perform the Auto Sequence
- Attempt recovery a predefined number of times
- Continue working if the issue is resolved
If the same error continues after the allowed number of attempts, the robot will stop and send an alarm notification.
Good to know: The error counter resets automatically whenever the robot reaches the headland and starts the next pass.
AUTO SEQUENCE SETTINGS
You can find the Auto Sequence settings directly below the ON/OFF switch on Page 4.1.2.2.
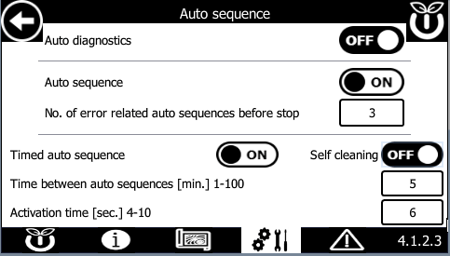
1. Number of Error-Related Auto Sequences Before Stop
This setting determines how many recovery attempts the robot will make for the same error during a single pass before stopping.
Example: If this value is set to 4, the robot will try the Auto Sequence up to four times for the same issue. If the error occurs again after the fourth attempt, the robot will stop and notify you.
2. Timed Auto Sequence
When enabled, the robot performs the Auto Sequence automatically at regular intervals, even if no error has occurred.
This preventive action can help reduce the likelihood of recurring problems and keep the machine running smoothly in demanding conditions.
3. Time Between Auto Sequences (1-100 min)
Choose how often the Timed Auto Sequence should run.
For example, setting the value to 15 minutes means the robot will perform the sequence every 15 minutes.
4. Activation Time (4-10 sec)
Set how long the Auto Sequence remains active.
This duration applies to both:
- Timed Auto Sequences
- Error-Related Auto Sequences
4. Self Cleaning
When enabled, the robot at regular intervals drives backwards for 10cm while keeping the hitch low. This action cleans the weeding wires and knives from plants buildup.
TIPS FOR BEST RESULTS 😉👍
Timed Auto Sequences can be particularly helpful when working in conditions that increase the risk of blockages or accumulated material.
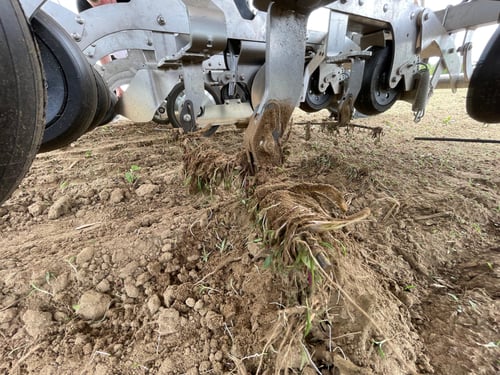
For example, a large buildup of weeds around the weeding assembly may be a good reason to enable this feature.
- Sticky Soil or Heavy Crop Residue: When seeding in wet, sticky soils or fields with large amounts of crop residue, material can build up around the seed valve housing. Regular Auto Sequences can help clear this buildup and maintain seed flow.
- Dense Crops or High Weed Pressure: In heavy weed conditions, weeds may wrap around parts of the weeding assembly. By lifting the hitch and cycling the weeding arm, the Auto Sequence can help free accumulated weeds and maintain performance.
Every field is different. Adjust:
- How often the Timed Auto Sequence runs
- How long it remains active
based on your field conditions, crop type, soil conditions, and weed pressure. Finding the right settings can help maximize uptime and reduce unnecessary alarms.