
FD20 & FD60: Test Your Seed Setup Before Sowing
Before starting work in the field, run a Seed Test to make sure your robot is sowing accurately. This allows you to verify that your seed disc, sowing settings, and seed spacing are set correctly and will deliver the results you expect.
Why run a Seed Test?
- Reduce the risk of sowing errors.
- Confirm that seeds are being dispensed correctly.
- Avoid wasting time and seed in the field.
- Fine-tune your settings before operation.
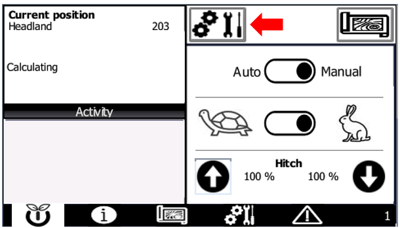
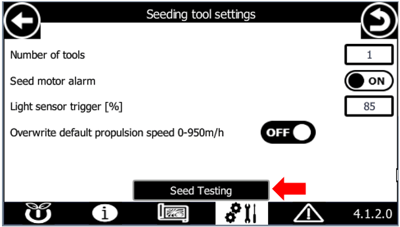
Open the Seed Test Menu
On the HMI, open the Seed Test menu and follow the on-screen instructions.
You can adjust settings and run multiple tests until you are satisfied with the results.
Understanding the Seed Test Parameters
The Seed Test menu displays several settings and results:
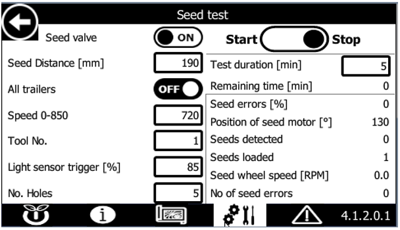
- Seed Distance (mm): The planned distance between seeds in the field.
- Speed: The robot's driving speed used during the test.
- Test Duration: The total length of the test
- Seed Errors (%): The percentage of sowing errors detected during the test.
-
Common causes of seed errors
- Seeds are not released from the disc.
- The light sensor is not sensitive enough and misses seeds.
- The light sensor is too sensitive and detects false seeds.
- Seeds are released incorrectly due to a worn or blocked valve.
-
- Seeds Detected: The number of seeds detected by the sensor during the test.
- Seeds Loaded: The number of seeds picked up by the seed disc (NOTE: theoretical number, based on number of holes and RPM).
- Seed Wheel Speed (RPM): The rotational speed of the seed motor.
- Light Sensor Trigger (%): The sensitivity of the seed detection sensor. The default value is usually 85%.
- Tool No.: The seeding unit being tested.
Seed Test for Single or Group Seeding
- Enter the number of holes on the seed disc you are using.
- Enter the desired seed distance.
- Set the test duration.
- Minimum: 5 minutes
- Recommended: 10 minutes
- Select the correct Tool No. (seeding unit).
- Set the Light Sensor Trigger:
- Seeds larger than 1.5 mm: 85% (recommended)
- Seeds smaller than 1.5 mm: 93%
- Place a container under the seed outlet.
- Start the test.
- Review the results and adjust settings if needed.
Troubleshooting
-
High number of seed errors:
-
Make sure the seeding unit is mounted correctly.
- Check whether seeds are stuck in the holes of the seed disc.
-
- Motor RPM above 16
-
Use a seed disc with more holes.
- Or reduce the robot's driving speed.
-
- Motor RPM below 8
- Use a seed disc with fewer holes.
-
Or increase the robot's driving speed.
Seed Test for Row Seeding
Follow these steps:
- Set the test duration.
- Minimum: 5 minutes
- Recommended: 10 minutes
- Select the correct Tool No. (seeding unit).
- Set the Light Sensor Trigger:
- Seeds larger than 1.5 mm: 85% (recommended)
- Seeds smaller than 1.5 mm: 93%
- Place a container under the seed outlet.
- Start the test.
- When the test is complete, weigh the collected seeds.
- Compare the measured weight with your planned driving speed and sowing settings to confirm the correct seed rate.
Troubleshooting
-
Seed weight is below the target: Decrease the seed distance.
-
Seed weight is above the target: Increase the seed distance.
-
Motor RPM above 16:
-
Use a seed disc with more holes.
-
Or reduce the robot's driving speed.
-
-
Motor RPM below 8:
-
Use a seed disc with fewer holes.
-
Or increase the robot's driving speed.
-