
Before performing the test, we advise the users to go through the following link to check the recommendation with regards to the crops and suggested seed discs accordingly:
https://knowledge.farmdroid.io/tested-crops-and-sowing-wheels
It is always a good idea to use this tool prior to sending the robot on the actual field, eventually ensuring it is going to perform as needed.
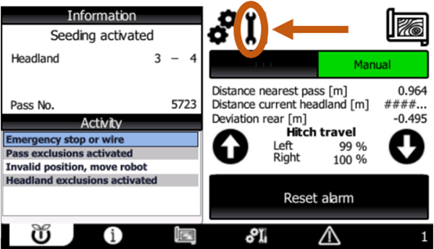
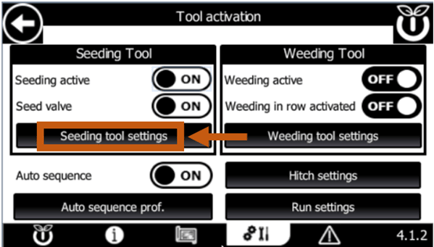
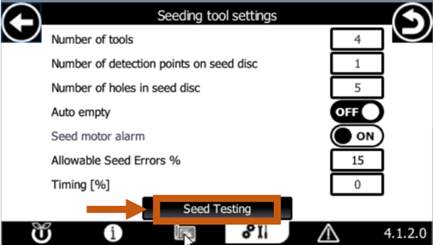
Below are the images of the procedure on the HMI Screen to get to Seed Test menu:
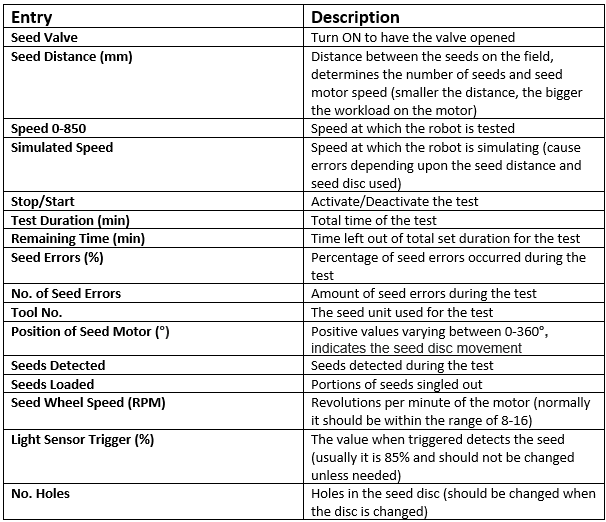
The Seed Test menu has several entries to be filled in so the user can try and see the results with different values.
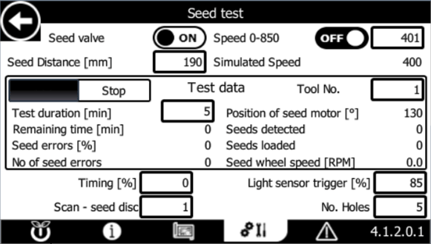
A brief description of all the entries is shown below:
Single or Group Seeding:
Following are the steps to begin with the seed test:
- Go through the link to see the best fit for the required output
- Enter the value for seed distance
- Keep the speed button OFF (for the beginning, only change if the desired result is not acquired)
- Set the duration of the test (a minimum of 5 minutes is set to give adequate results)
- Select the seeding unit (Tool No.) to be used for the test
- If the seed size (diameter) is > 1.5 mm, leave the Light Sensor Trigger (%) at the default value of 85%
- If the seed size (diameter) is < 1.5 mm, set the Light Sensor Trigger at 93%
- Put a container under t
- he seed valve outlet
- Start the test
- Observe the seeds by placing your hands under the seed valve outlet
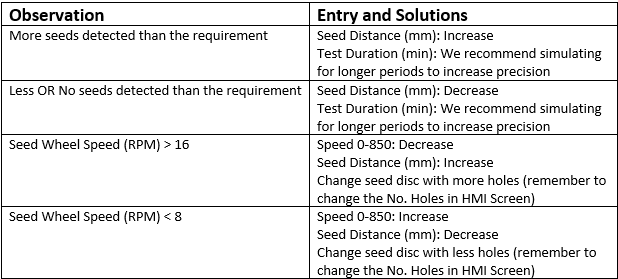
The table below shows the entries that can be adjusted when encountering errors:
An example of a seed disc used for single/group seeding:
.jpg?width=257&name=4%20(2).jpg)
Row Seeding:
Following are the steps to do the seed test:
- Go through the link to see the best fit for the required output
- Enter the value for seed distance
- Keep the speed button OFF (for the beginning, only change if the desired result is not acquired)
- Set the duration of the test (a minimum of 5 minutes is set to give adequate results)
- Select the seeding unit (Tool No.) to be used for the test
- If the seed size (diameter) is > 1.5 mm, leave the Light Sensor Trigger (%) at the default value of 85%
- If the seed size (diameter) is < 1.5 mm, set the Light Sensor Trigger at 93%
- Put a container below seed valve outlet
- Start the test
- Upon finishing the test, measure and enter the weight of seed collected in container, also the values from HMI for robot speed, working width and seed distance in excel spreadsheet
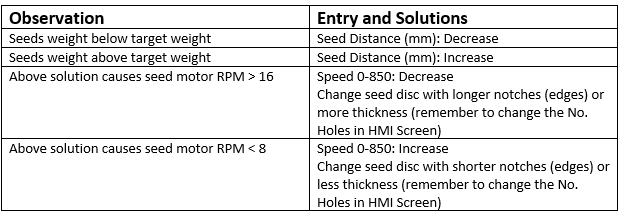
The table below shows the entries that can be adjusted when encountering errors:
An example of a seed disc used for row seeding:
.jpg?width=265&name=5%20(2).jpg)