
For the user to remove their FD20 from the pallet upon delivery, several steps are to be
taken, it is important that these are done in the correct order, as any missed steps might
result in a problematic removal.
Step 1: Remove all plastics and wrappings from the FD20 solar panel, and discard these in a proper manner. When you are done, there should be no further plastic visible on the top of the FD20.
Step 2: In seeding box 1 or 6, you should be able to find the front and rear GPS antenna
for the Droid. Attach these and secure them appropriately upon the FD20.
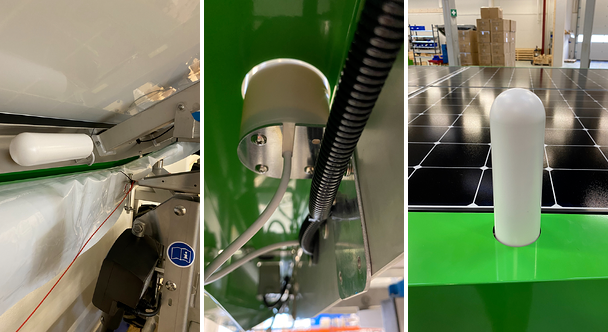
Step 3: The GSM antenna is located next to the front GPS antenna mount, just underneath the green skirts. Secure it in vertical position, as shown in the images below:
Step 4: Remove the fixation from all the bottom parts of the Droid, these consists of all
strips securing the Droid to the actual pallet.
Step 5: Remove the field bracket and all additional equipment from below the Droid, and place it aside, in an appropriate position.


Step 6: Extend the front wheel of the Droid and secure it in place using the bracket pins.
Step 7: Extend the front safety wire holder and secure it in place.

Step 8: Secure the safety wire appropriately, this can be done by placing it upon the
safety wire holder, and then extending it.
Step 9: Move Operator panel out.
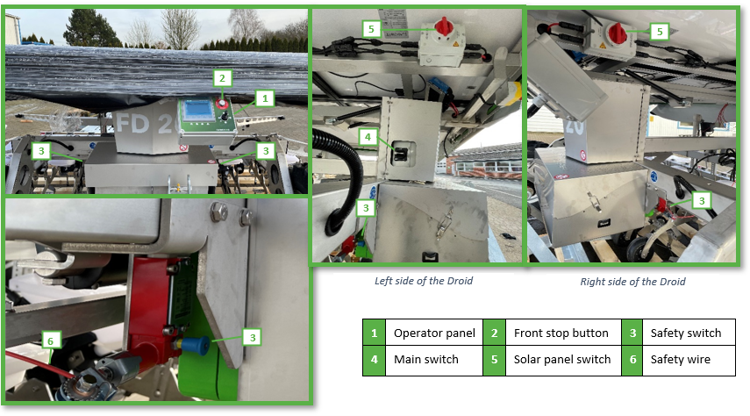
Step 10: Disengage all safety stops, both the one next to the HMI screen, as well as the safety switch connected to the safety wire on either side (green ring will appear).
Step 11: Engage the Droids main switch, to turn on the Droid.
Step 12: Engage the solar panel switch.
Step 13: Turn on the Droid by pressing down the Front Stop button until the HMI Screen lights up (approximately 30 seconds.) The button is placed on the front of the FD20 HMI/Screen)
Step 14: Lower the FD20 lift to free up the blocks placed below it (use Hitch travel).


Step 15: Remove the blocks from below the FD20 Lift, these are screwed in place, and the screws should therefore be removed to free the blocks.
Step 16: Raise the lift back up to 100 Percent
Step 17: Lower speed to minimum with the HMI panel (press the turtle icon)
Step 18: Begin slowly moving the Droid forward by the joystick, until it is free from the pallet. Ramps can be placed below the wheels to ease the drops from the pallet, and therefore if such are available, it is highly recommended to use these.
