Troubleshooting: dusted light sensor
What triggers the alarm - How to clean the sensor
WHAT TRIGGERS THE ALARM
During seeding, dust and particles both from the ground, as well as from the seeds themselves when going through the seeding unit, tend to build up over the light sensor until it is not able to detect the falling seeds anymore. When this happens, your robot will stop and display a "dusted light sensor" message on the HMI.
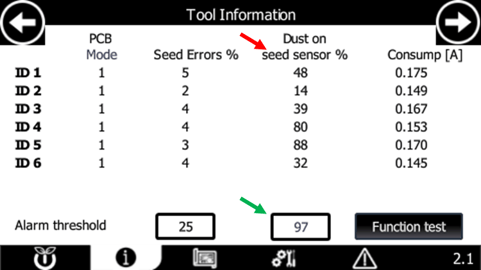
The percentage of dust can be monitored, when seeding, in page 2.1 Tool Information:
- In the column "Dust on seed sensor %" (red arrow, image below) you can monitor the amount of dust for each of the seeding units
- In the "Alarm threshold" cell (green arrow, image below), you can set the value above which the robot stops and send you a message

TIPS AND TRICKS 😉👍
As a user, it is up to you to decide at what dust percentage the robot must stop and send you an alert message.
Our general recommendation is to use an alarm threshold of 85% for the dust on the seed sensor
HOW TO CLEAN THE SENSOR
To clean the sensor,
The sensor is located about 1 centimeter inside the assembly and is easily reachable for cleaning.
To remove the dust:
- Lift the hitch all the way up
- Trigger the safety stop button, to make sure nothing moves while you are inside the safety zone
- Use a soft brush for cleaning bottles (see image below) or, alternatively, a soft damp cloth or a cotton swab to clean the area around the light sensor
- Disengage the safety stop button and reset the safety alarm once you are outside the safety zone and resume the autonomous seeding operation

CAUTION! 👇
You should not use any aggressive cleaning method such as hard tools (e.g. screwdriver) or compressed air to remove the dust over the sensor, else you would permanently damage it.
